Showing posts with label black. Show all posts

Tuesday, January 1, 2013

Happy New Year!

So sorry for my lack of posts, I've been busy with the holidays and also very sick for a few days - I even had to stay home from school :(

Here's a few photos to show what I've been up to recently:

On Christmas Eve I went to visit my best friend's mom who also lives in Florida!

Then, on Christmas Day we drove over to Orlando and went to Universal Studios Islands of Adventure park!
It was awesome, because there is a Dr. Seuss and Harry Potter section of this park :)
 Seuss Landing :)
 Paul standing in huge crowd of people!
I met the Cat in the Hat!
 Hogsmeade

 Ollivander's Wand Shop
 Standing in front of Hogwart's
 Hagrid snowman
 Hogwarts Express train!
 All of the pictures talked and moved, just like in the movies!
 Various stuff from the classroom
 Dragon skeleton from the classroom

The Hogwarts ride was freaking amazing - even though we waited 2 1/2 hours on line!

My mom got me a really cute crock pot slow cooker for Christmas, and I already made chili and pulled chicken in it!


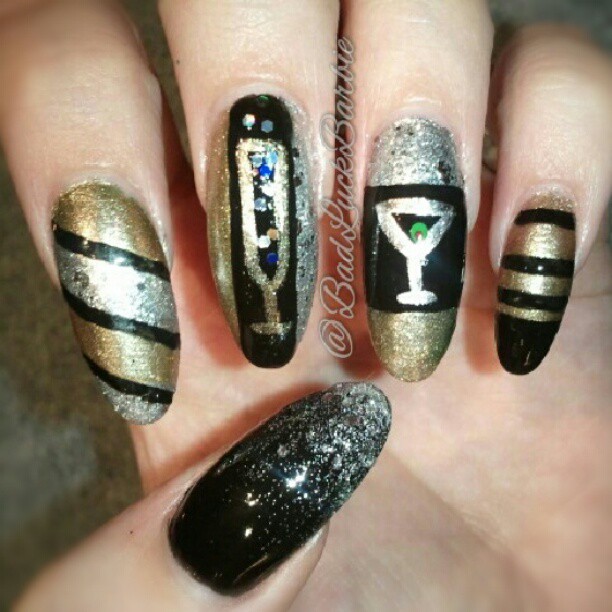
Here is my New Year's Eve design, a glass of champagne and a martini!

How was your holiday/New Years Eve? 
I hope you all had a great time :)

Tuesday, November 13, 2012

Tutorial Tuesday: French Manicure

I've been very busy this week so I chose something simple and practical for this week's Tutorial Tuesday..  
French Manicure!
This French mani will be done in almost the exact same manner as the Half-Moon Mani and will require the use of paper reinforcement stickers.
You can purchase these at any office supply store, and I've even seen them at dollar stores.

How To Choose Colors For This Design:
Any colors your little heart desires!
Just make sure the tip color is opaque enough to cover the base nail color!

Suggested Materials:
ANY brand is fine, listed below are the ones used for this particular mani
- Base coat - Seche Clear
- Fast dry top coat - Seche Vite
- Nail color - LeChat UV gel "Midnight Pearl" with Young Nails "Funkadelic" glitter
- Tip color - Spoiled "Visually Slimming"
- A clean, small paintbrush or cotton swabs, for cleaning the cuticles afterwards (optional)
- Nail polish remover (optional)

Before You Begin Painting Your Design:
These steps are optional, but definitely recommended!
- Put down some paper towels in your work area, in case of any spills.
- Be sure to remove any old nail polish.
- Gently file nails into desired shape and remove any ridges with a buffer.
- Push back cuticles with a cuticle pusher or orange wood stick and trim if desired.
- Apply a base coat to protect from potential staining from color polish; wait for it to dry completely.

Step 1:
Take a circle sticker and stick it to the palm of your hand.  Remove it, and re-stick it 4 or 5 times.  
This is to reduce the stickiness of the tape and makes it much easier to peel off of your nails later on.

 Step 2:
Apply 2 coats of the base color and allow to dry.
You can use any brand of fast-drying top coat to speed up this process.
Don't worry too much about being super neat, you can remove excess polish from your cuticles later.
**It is VERY important to allow all polish to dry before applying the tape over it, otherwise the polish will get stuck to the tape and come off**

Step 3:
Gently  apply the circle stickers.  
Place the top half of the circle near the free edge of the nail, the bottom half of the circle should be over the rest of your nail. (You can click the photo to enlarge & see it better.)
I aimed for approximately 1/6th of my nail. 
You can do more or less, depending on how big you want your French tips to be!
The nail naturally curves, so the sticker might need to be adjusted a bit near the free edge.
*Try to avoid any bubbles near the edges of the tape because the top color could get into the bubble and you'll have to start all over!*

 Step 4:
Beginning at the outermost edge of the circle sticker, paint 1 or 2 coats of the French tip color over the base nail color.
It's better to paint a tiny bit over the sticker this way your edge will be clean.  
You can click the photo to enlarge & see a little better.

 Step 5:
Gently  peel the sticker off once the tip color is mostly dry.
Be very careful not to rip it off too quickly, or the polish could come right off.
Also, be careful if the polish is still very wet on the top of the sticker, it could get onto your base color.
Use a new sticker for each nail, since there will be wet polish on the used ones.

Step 6: 
(Forgot to take a pic sorry!)
If necessary, clean up cuticles using polish remover & a brush.
Top it all off with your favorite top coat.

And there ya go!
Simple & easy French Mani :)

For all past Tutorials click here

Thursday, October 25, 2012

Pattern: Argyle!

Argyle patterned kawaii style nails with 3D acrylic bow :)
I did these using Essie "Lilacism", black acrylic and striper brush & glitter nail art striper.

Sunday, October 7, 2012

Inspirations

 Sorry it took so long to update, still unpacking everything!!
I don't know where my nail stuff is yet anddd this week's Sunday Social is kinda boring so...

Here are a few photos of friends who were inspired by my tutorials! :)
This one is from one of my best friends, Cassi.  She was inspired by the Half Moon Mani Tutorial.   She did a perfect job recreating the shiny black and matte grey!
 And this one was done by my friend Elyse.  She did this using the Tape Mani Tutorial.  The awesome color combinations were part of her outfit for the Susan G. Komen for the Cure breast cancer walk yesterday in Houston, Texas. 

Thank you so much for sharing these pictures.  I'm really glad you were inspired & I would love to see more nail art from you all!!<3

Saturday, September 29, 2012

Swatch, Review & a Little Halloween Fun: "Day Glow" by Serum No. 5


One magical day, I stumbled upon another blogger's review of "Day Glow" by Serum No. 5.
I was instantly obsessed, and decided I had to have it.
It is so much more vibrant and better than any other glow polish!  It even glows in partial darkness!
You can check out the Glow in the Dark Skeleton nails for comparison with another glow polish.

I had a feeling that "Day Glow" would be in high demand and I was right.
By the time I checked Etsy, the full size bottles were sold out so, naturally, I ordered 2 minis.
By the time my order was completed, "Day Glow" had been completely out of stock!!


Here is my little mini, in all of it's glory.
3 coats of "Day Glow", over 1 coat of Essie "Fiji" - it's recommended to use a white (or almost white, in this case) base color to make the "Day Glow" a little more opaque.
In full darkness. 
 Added some fun Halloween designs :)
In partial darkness.
For comparison, this skeleton was done with China Glaze "Ghoulish Glow", shown in partial darkness.
You couldn't even see it on my camera in full darkness because the glow wasn't strong enough.
"Day Glow" is far superior.


Let me just say I am absolutely in love with Serum No. 5 "Day Glow".  
Application was a dream, it's not streaky or lumpy like other glow polishes. 
The price is reasonable - $6 for a mini and $12 for full size, and they were shipped very promptly.
Keep an eye on Serum No. 5's Etsy store for updates on restock!

Thursday, September 27, 2012

Teach Me Something Thursday: Ikat Patterned Nails

My friend Michele from shortgirllongisland has a fun feature on her blog called "Teach Me Something Thursday".  
She had asked me a few weeks ago if I'd like to do a special nail art tutorial exclusively for her blog, and of course I was more than happy to oblige! 
I did ikat patterned nail art, which is a lot of fun and pretty easy to do.
Ikats are patterned textiles and fabrics produced by tying and resist-dying threads before weaving, similar in process to tie-dying.

**For the full tutorial, check out Michele's feature Teach Me Something Thursday: Volume Four **


There was a bit of a glare indoors so I ventured outside to get another photo :)

Wednesday, September 26, 2012

Half-Moon Mani: Round 2

Yesterday's half-moon mani colors were just too... old ladyish for me.
I decided to re-do them this morning.

This time, I opted for a matte graphite color by China Glaze called "Stone Cold" as the half-moon base color. (I reviewed and swatched  it not too long ago)
On the rest of the nail, I used China Glaze "Liquid Leather" which is a very shiny patent leather black.
I also topped off the black with a coat of Seche Vite to make it extra shiny so the matte of the half-moon stands out even more.
I can actually see my reflection in the sleek black shinyness!
I like this look much better.  It's more sultry and modern, but still has a classy vintage appeal.