Thursday, November 29, 2012

Learning: Acrylic & Gel Inlays

 Here's a little update on what I've done at school.
The latest things we have learned is called "inlays" or "encapsulating".
This can be done with UV gel or acrylic.
The trick is to work with very thin layers & creating a base, color, an item to be encapsulated, and then a clear layer over the top to seal it in.
You can encapsulate almost anything: glitter, confetti, lace, googly eyes, candy wrappers, feathers, etc.!
Here are some encapsulations or inlays I've done on classmates.

 This encapsulated glitter was done with UV gel and a brush. 
UV gel is a bit different than gel polish, it's VERY sticky and can be a lot messier!
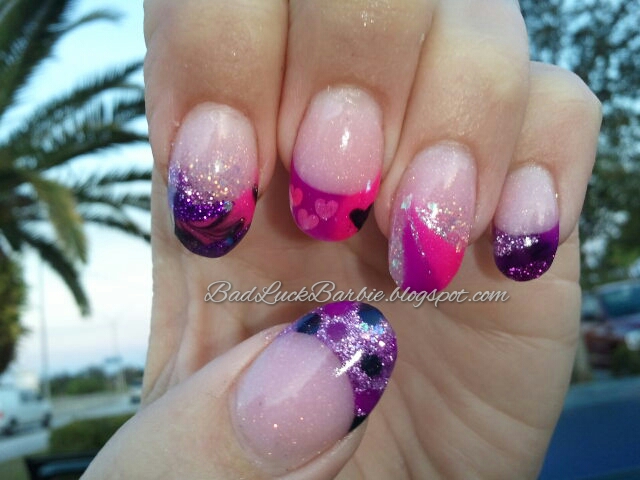
 Here are some acrylic inlays, done on the end of a French tip and some fades as well.
4 different glitters, acrylic polka dots, heart & star confetti and marblized acrylic!
Here's another view of the acrylic.. and some palm trees in the back haha (so difficult to get a good photo of these nails!)

Tuesday, November 27, 2012

Sponge Gradient Mini Tutorial & Winter Wonderland!

 Since I've moved to Florida and it's been 75-85 degrees every day, it doesn't really feel like the Holiday season to me!
I figured I would do a snowflake design to try to invoke some holiday spirit hehe
Here is my version of a Winter Wonderland!
 Indoor shot with flash.
Outdoor shot, natural sunlight.
I achieved this Winter Wonderland look by doing a dark/light blue sponge gradient, a coat of multicolored glitter and then hand painting each snowflake on top with acrylic paint and a tiny brush :)
This isn't a traditional tutorial but I think it can be explained pretty easily!

What I used, in order from lightest to darkest:
- Essie "Ballet Slippers"
- Essie "Bikini So Teeny"
- Sinful Colors "Aquamarine"
- China Glaze "Sexy in the City"
- Sally Hansen Xtreme Wear "Disco Ball" for the glitter
- Seche Clear base & Seche Vite topcoat

I am not that great at doing sponge gradients, but here is a brief explanation of how I do it:
 1. Choose whatever colors you want to do a fade, it can be anything but I find it easier to do a gradient of 1 color since it will blend easier.
2. Cut a nail-sized piece of a make up sponge.  I use the wedge shaped ones and cut off a corner.
3. Use any base coat, let it dry.
4. Paint 2 thin coats of the LIGHTEST color from the fade & allow to fully dry.
I used a coat of Seche Vite fast drying topcoat to speed this up!
5.  Paint a stripe of each color across the sponge in the order of however you'd like the gradient to go.
6.  Dab the sponge in an up-and-down motion along the length of the nail.
It will look kinda crappy at first, but the more you dab it, the better the colors will blend.
7.  It's damn near impossible to do a sponge gradient without getting polish all over your cuticle/skin, so don't be alarmed if you are making a royal mess!
Once you are happy with your gradient, and you've finished off with a topcoat, you can begin your cuticle cleanup!
Simply dip a clean, small paint brush or cotton swab in nail polish remover and swish it around a bit to clean up your cuticles.
Be sure to avoid getting any on the design, so you don't ruin it.

*If your colors are a little light, just repeat steps 5 & 6 until the desired color is achieved!*
I went over these about 3 or 4 times before I was finally happy with the colors, so please don't be discouraged.


Here is the gradient pre-snowflakes..  I'm really not great at it but it makes a good enough background!
If you'd like to try to hide some of the imperfections in your gradient, it's great to use a small/fine glitter topcoat.. it will help the colors to appear more blended and smooth! :)


Enjoy!

Sunday, November 25, 2012

Sunday Social!

Sunday Social is a fun & simple way to help your readers get to know you a little better.
You can link up with your blog at ashleyscarnivalride or acompletewasteofmakeup and join in on the fun! :)
 Questions about 4's

1. Name 4 jobs you've had in your life:
Well.. I've worked at 4 different tattoo shops as a professional body piercer over a span of 9 years.
I also worked at Sally's Beauty Supply for about 5 months.
Right now I am jobless lol.

2. Name 4 movies you could watch over and over:
- Anchorman
- Rocky Horror Picture Show
- Nightmare Before Christmas
 - Wayne's World

3. Name 4 places you have lived:
Franklin Square, NY
Selden, NY
Lake Grove, NY
Farmingville, NY
I've moved around a lot haha now I live in Southwest Florida!

4. Name 4 of your favorite foods:
My grandma's stuffing (or "dressing" as some people call it)
Veal or chicken parmigiana
Bacon, eggs & cheese on a bagel - especially a NY bagel!
General Tso or Sesame Chicken from a Chinese restaurant

Thursday, November 22, 2012

Learning: Glitter Acrylics!

Happy Thanksgiving to all of my friends & followers!
I hope you are all having a wonderful day, and watch out for crazy people if you are doing any Black Friday shopping!!

Just thought I would share a pic of what I learned in school yesterday!
These are super fun glitter acrylics!
The two on the left are 2 colors faded together, and the others are french with 2 colors faded into the french tip :)
I tried to blur out the creepy fingers to enhance your viewing experience lol.
Enjoy!

Wednesday, November 21, 2012

Theme: Thanksgiving Water Marble!

I am really awful water marble nail art.
If you are unfamiliar with water marbling, you can read about it here.
Basically, you put drops of polish into water and it spreads on the surface and you swirl the colors together.
I have tried for hours at a time... but for some reason, it never works out very well for me!

I wanted to give it another shot using some Thanksgiving colors.
After 2 attempts tonight, here are the results:
Not too great, but I do like the color combinations.
Colors used: Essie "Sew Psyched", "Orange It's Obvious" & "Very Structured", Avon "Sunshine" and LA Colors "Hot Blooded"
I noticed that the Essie polishes did not really enjoy being put into water, and were very resistant to spreading on the surface.
I think next time I water marble, I will try to avoid Essie.

Tuesday, November 20, 2012

Theme: Thanksgiving! Gobble Gobble!

Here is a silly turkey I did for Thanksgiving!
The base color is Butter London "Wallis", 
the turkey is hand painted with acrylic paints, 
and stuck on some googly eyes from the craft store :D
Gobble gobble!

Sunday, November 18, 2012

Sunday Social!

Sunday Social is a fun & simple way to help your readers get to know you a little better.
You can link up with your blog at ashleyscarnivalride or acompletewasteofmakeup and join in on the fun! :)
 This week is just a general question of what we're thankful for, and to post some photos.
 (The photos are small, but if you click it, they will enlarge)


1. First and foremost, I'm extremely thankful that my entire family in NY was safe during Hurricane Sandy.  
I have a fairly large family, my mom is one of 8 and my dad one of 3 - and all are married with at least 2 children!
Most of them lost power, some for more than a week, and only 1 house had major flooding.
I know that many people were not as fortunate, and for that I'm grateful.

2. I am thankful for my younger sister.
Many siblings don't have close relationships, so I am glad that her and I have always been close.
We both had to grow up rather quickly, and a lot of the time I felt more like her parent than her sister.
We may fight sometimes - what family doesn't?
We may not see each other every day like we used to..
But we both know at the end of the day, we would do anything for each other!
This was when we met Lady Gaga last year!

3. I am also thankful for my boyfriend.  
It's easy to take someone for granted, especially when you see them every day.
We've been together for almost a year, and even though he drives me completely insane sometimes,
 he is genuinely a really good person.
He's very supportive of all of my decisions, such as dying my hair 3 different colors or going to nail tech school.
He is trusting and never jealous.
He tells me he loves me all day, every day.
And he would do just about anything for me if I asked.

4. YOU!!
I am so thankful for all of my friends, readers & followers.
Without your kind words, ideas and support, I would not be motivated!
Thank you so much!
http://ihearteleanor.com/wp-content/uploads/2011/02/heart-clip-art.jpg

What are you thankful for? :)

Saturday, November 17, 2012

Learning: More Acrylic Art!

Some more acrylic nail art that I experimented with yesterday at school!
(Yes, more creepy fingers but it's okay you will get used to them! haha)
 Green & black marble, various rainbows, 3D bow  - the rainbows were so much fun to do!
3D kissy lips & 3D hearts
My work station at school :)

Hope everyone is having a great Saturday!

Friday, November 16, 2012

Fashion Friday: Rebecca Minkoff

 If you're not familiar with Fashion Fridays collaboration - 
Fashionblogger & my bff Cassi from The Granny Treatment chooses a fashion collection,
then I choose 5 outfits/designs I want to recreate as a mani!

This weeks Fashion Friday inspiration is Rebecca Minkoff Fall 2012 Runway Collection!
I achieved this look using a combination of nail polish, acrylic paint, matte & shiny topcoat and "sand" texture!

Here are the swatches of what I used as inspiration:

Enjoy & have a Happy Friday! :)

Thursday, November 15, 2012

Learning: 3D Acrylic Art

Yesterday at nail school was a very busy day!
We had an event called "Professional Day" and everyone was allowed to wear fancy clothes, 
and we even decorated the school.
There are also a lot of students at this school studying cosmetology and aesthetician.
Each section of the school had to pretend that they were a real salon, so there was a "manager" and we kept track of how much "money" we made doing services.
 Our "nail salon" won an award for top performance! :)

We also learned a little bit of simple 3D acrylic art.. 
It was a nice change from just doing pink and white acrylic.
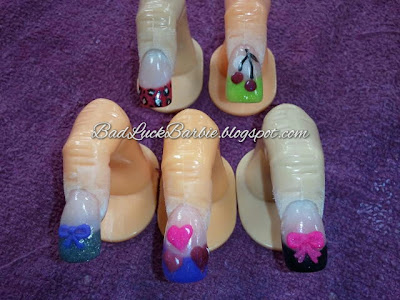
Don't mind the weird plastic fingers, it's what they give us to practice on but they are kind of creepy!
3D Acrylic cherries, bows, and hearts over colored acrylic tips and painted leopard spots over red acrylic tip.
Here is a small Hello Kitty done on a regular pink & white, using 3D acrylic bow and striper brushes.

 My new friend at nail school loves pansies, and her mother's name is Pansy so I tried to create a 3D acrylic pansy flower.. here is my first attempt!
It was difficult!
Since it was professional day, I made my boyfriend come in to get a manicure so I could make more "money" for the pretend salon hehe :)

Tuesday, November 13, 2012

Tutorial Tuesday: French Manicure

I've been very busy this week so I chose something simple and practical for this week's Tutorial Tuesday..  
French Manicure!
This French mani will be done in almost the exact same manner as the Half-Moon Mani and will require the use of paper reinforcement stickers.
You can purchase these at any office supply store, and I've even seen them at dollar stores.

How To Choose Colors For This Design:
Any colors your little heart desires!
Just make sure the tip color is opaque enough to cover the base nail color!

Suggested Materials:
ANY brand is fine, listed below are the ones used for this particular mani
- Base coat - Seche Clear
- Fast dry top coat - Seche Vite
- Nail color - LeChat UV gel "Midnight Pearl" with Young Nails "Funkadelic" glitter
- Tip color - Spoiled "Visually Slimming"
- A clean, small paintbrush or cotton swabs, for cleaning the cuticles afterwards (optional)
- Nail polish remover (optional)

Before You Begin Painting Your Design:
These steps are optional, but definitely recommended!
- Put down some paper towels in your work area, in case of any spills.
- Be sure to remove any old nail polish.
- Gently file nails into desired shape and remove any ridges with a buffer.
- Push back cuticles with a cuticle pusher or orange wood stick and trim if desired.
- Apply a base coat to protect from potential staining from color polish; wait for it to dry completely.

Step 1:
Take a circle sticker and stick it to the palm of your hand.  Remove it, and re-stick it 4 or 5 times.  
This is to reduce the stickiness of the tape and makes it much easier to peel off of your nails later on.

 Step 2:
Apply 2 coats of the base color and allow to dry.
You can use any brand of fast-drying top coat to speed up this process.
Don't worry too much about being super neat, you can remove excess polish from your cuticles later.
**It is VERY important to allow all polish to dry before applying the tape over it, otherwise the polish will get stuck to the tape and come off**

Step 3:
Gently  apply the circle stickers.  
Place the top half of the circle near the free edge of the nail, the bottom half of the circle should be over the rest of your nail. (You can click the photo to enlarge & see it better.)
I aimed for approximately 1/6th of my nail. 
You can do more or less, depending on how big you want your French tips to be!
The nail naturally curves, so the sticker might need to be adjusted a bit near the free edge.
*Try to avoid any bubbles near the edges of the tape because the top color could get into the bubble and you'll have to start all over!*

 Step 4:
Beginning at the outermost edge of the circle sticker, paint 1 or 2 coats of the French tip color over the base nail color.
It's better to paint a tiny bit over the sticker this way your edge will be clean.  
You can click the photo to enlarge & see a little better.

 Step 5:
Gently  peel the sticker off once the tip color is mostly dry.
Be very careful not to rip it off too quickly, or the polish could come right off.
Also, be careful if the polish is still very wet on the top of the sticker, it could get onto your base color.
Use a new sticker for each nail, since there will be wet polish on the used ones.

Step 6: 
(Forgot to take a pic sorry!)
If necessary, clean up cuticles using polish remover & a brush.
Top it all off with your favorite top coat.

And there ya go!
Simple & easy French Mani :)

For all past Tutorials click here

Sunday, November 11, 2012

Happy Veteran's Day!

Here's some hand-painted, patriotic goodness to celebrate Veteran's Day!
My grandfather was a Korean war vet,
My boyfriend was in the Marines and his father served for 30 years (it was also the USMC's 237th birthday yesterday!) 
And my cousin who is practically like my sister, is in Army boot camp as we speak.

THANK YOU to the brave men and women who serve our country, especially those who've made the ultimate sacrifice for our freedom!
  

Sunday Social!

Sunday Social is a fun & simple way to help your readers get to know you a little better.
You can link up with your blog at ashleyscarnivalride or acompletewasteofmakeup and join in on the fun! :)
This week is about Thanksgiving!

1.  What is your favorite Thanksgiving memory?
One year we made up a biscuit song because my sister just kept talking about biscuits, and every year after that we've sang it!
This year, I won't see my family because of moving to Florida, but the memories are just like it was yesterday.

2.   What is your favorite Thanksgiving food?
Definitely my Grandma's stuffing, I could literally eat it all day every day.. it's absolute perfection.
She also makes this thing called corn bake, corn muffin mix, creamed corn and a few other things mixed together to make almost like a casserole (this recipe is similar to the one she uses)

3.  What is a Thanksgiving tradition you and your family have?
On my dad's side of the family, grandpa used to always say grace, and when he passed away we've always said grace in his memory every year on Thanksgiving.
On my mom's side, when I was 13 or 14 my grandma told me and my sister when we were younger about "Thanksgiving sandwiches" - a layer of turkey, stuffing, cranberry sauce, mayo, salt & pepper on white bread.
We thought it sounded disgusting, until we tried it and were addicted - and ate them every year!
Now whenever I have one, it always brings back that fond memory of her.

4.  Show us a favorite Thanksgiving picture from years past.
Well.  I noticed we never actually take pictures on Thanksgiving because we are all usually stuffed & bloated pretty early in the day - and sleeping shortly thereafter haha.
The one photo I was able to find is from last year, it's me and my sister's plates.
Biscuits, corn bake, turkey, ham, baked mac & cheese, stuffed mushrooms, cranberry sauce, fried cauliflower... and that was just our first plates!!


5.  What are you most looking forward to about this Thanksgiving?
This year will be very different from every other year, since I will not be seeing my family at all.
I will spend Thanksgiving with my boyfriend, my mom's best friend Rosie & her son - the only other people I know down here in Fort Myers!
We were invited to go to Rosie's friend's house over on beautiful Sanibel Island.  There are kayaks at the house, so hopefully me and my boyfriend can go kayaking and explore a little bit :)

Friday, November 9, 2012

Fashion Friday: Thakoon

If you're not familiar with Fashion Fridays collaboration - 
Fashionblogger & my bff Cassi from The Granny Treatment chooses a fashion collection,
then I choose which designs I want to recreate as a mani!

This week we have decided to go with Thakoon's Fall 2012 Runway Collection.
I did this using a combination of nail polish and acrylic paint with matte, "sand" and gloss finishes.


Here are the swatches of what I used for inspiration:


Enjoy!
If you have any suggestions for a collection you'd like to see transformed into nail art, let me know!